BMad Method — 使用者指南 User Guide
本指南將幫助您理解並有效使用 BMad Method,進行以敏捷與 AI 驅動的計劃與開發。
The BMad Plan and Execute Workflow 計劃與執行工作流程
首先,這裡是完整的標準綠地(Greenfield)規劃與執行工作流程。棕地(Brownfield)流程非常相似,但建議先了解這個綠地流程,即使是在簡單專案上,然後再處理棕地專案。BMad 方法需要安裝到你新專案資料夾的根目錄。對於規劃階段,你可以選擇使用強大的網頁代理來執行,這可能會以遠低於自行提供 API 金鑰或在某些能動代理工具中使用點數的成本,獲得更高品質的結果。對於規劃來說,強大的思考模型與更大的上下文—以及作為代理的合作夥伴一起工作—將帶來最佳結果。
如果你打算在棕地專案(現有專案)中使用 BMad 方法,請參考「在棕地工作」。
如果下方的圖表無法顯示,請在 VSCode 安裝 Markdown All in One 與 Markdown Preview Mermaid Support 外掛(或其其中一個分支版本)。安裝後,當在分頁上按右鍵時,應會出現「開啟預覽」選項,或請參閱 IDE 的文件說明。
The Planning Workflow(Web UI 或 強大的 IDE 代理)
在開發開始之前,BMad 遵循一個結構化的規劃工作流程,理想上在 Web UI 中進行以節省成本:
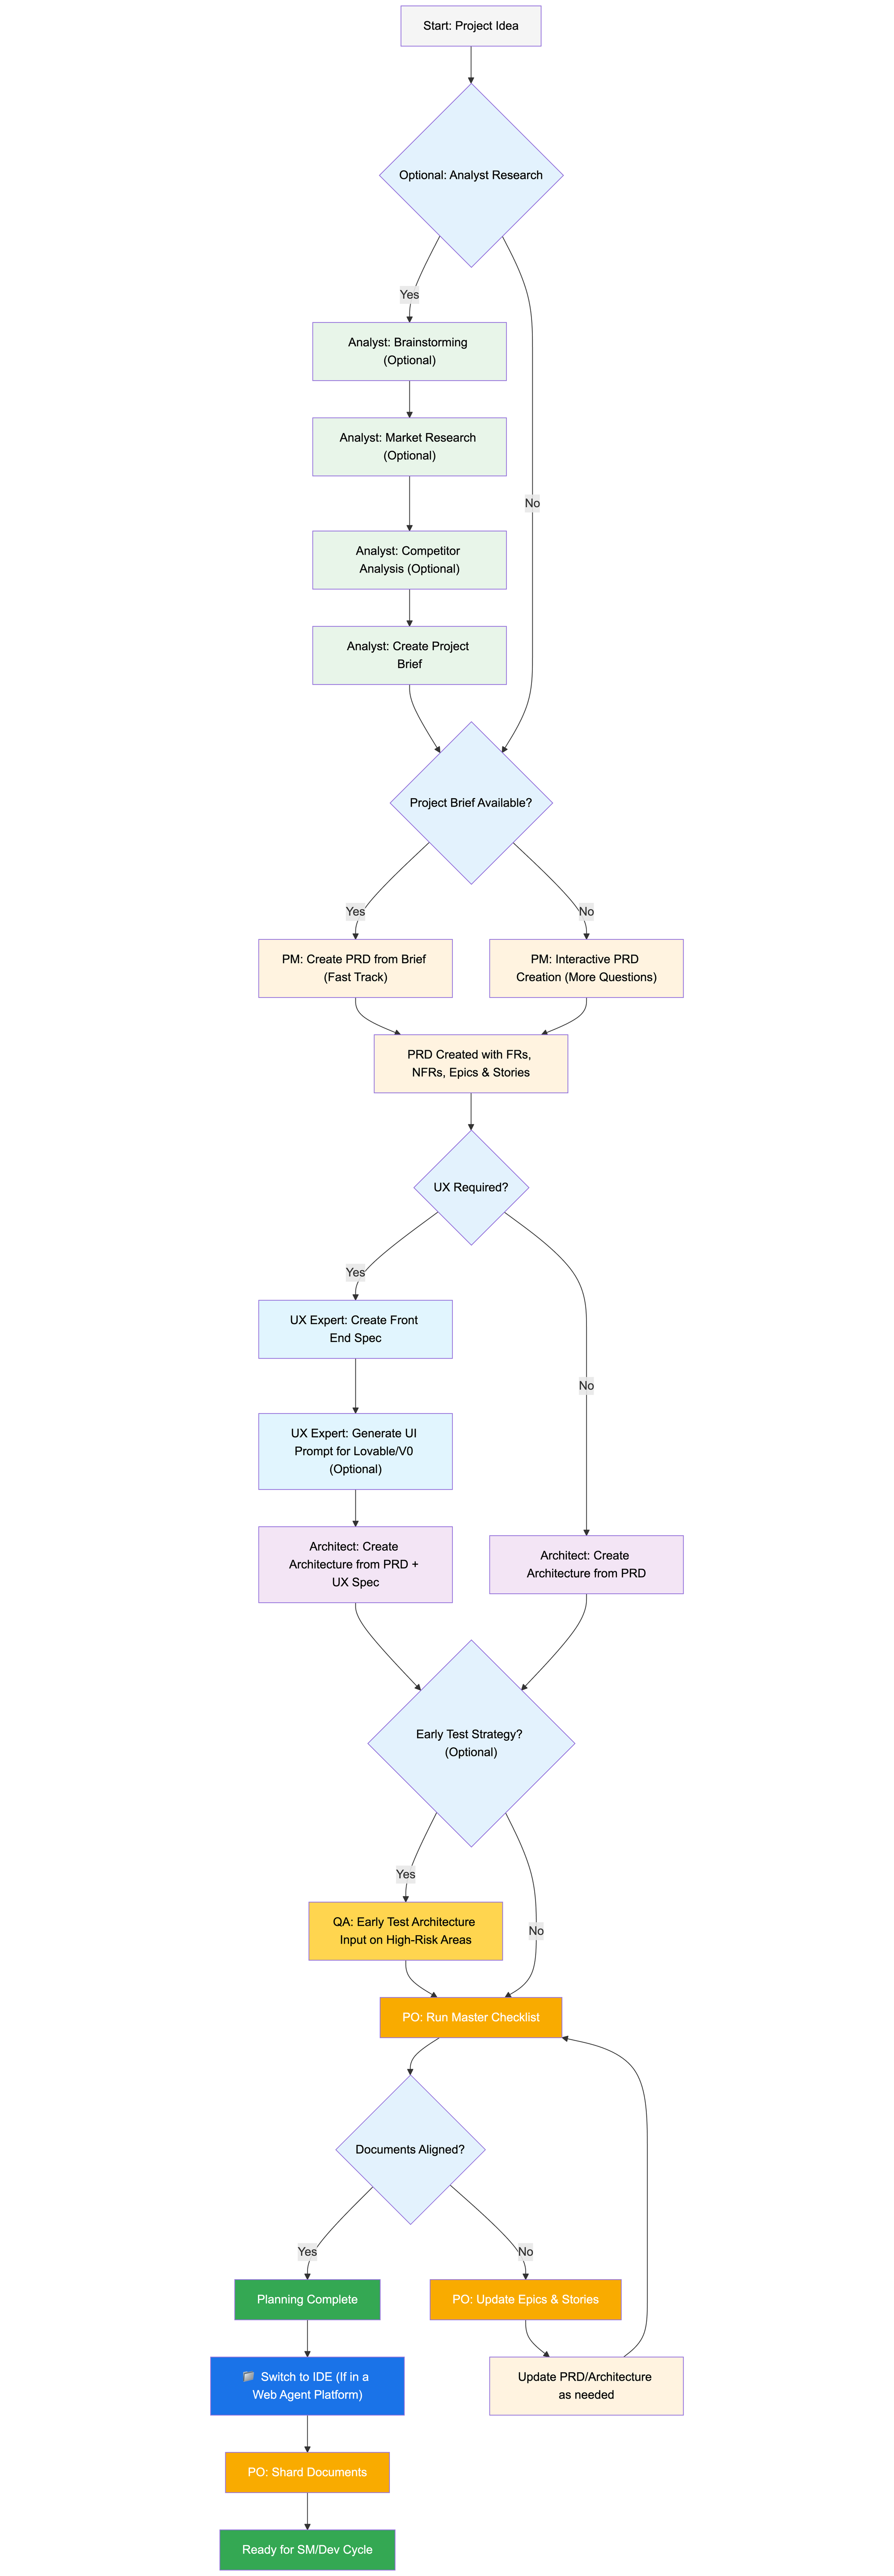
從 Web UI 轉換到 IDE
Critical Transition Point: Once the PO confirms document alignment, you must switch from web UI to IDE to begin the development workflow:
關鍵轉換點:一旦 PO 確認文件已對齊,你必須從 Web UI 切換到 IDE 開始開發工作流程:
- Copy Documents to Project: Ensure
docs/prd.mdanddocs/architecture.mdare in your project's docs folder (or a custom location you can specify during installation)
複製文件到專案:確保docs/prd.md與docs/architecture.md位於專案的 docs 資料夾中(或安裝時可指定的自訂位置) - Switch to IDE: Open your project in your preferred Agentic IDE
切換到 IDE:在您偏好的 Agentic IDE 中開啟您的專案 - Document Sharding: Use the PO agent to shard the PRD and then the Architecture
文件分片:使用 PO 代理將 PRD 分片,接著是架構文件 - Begin Development: Start the Core Development Cycle that follows
開始開發:啟動接下來的核心開發循環
Planning Artifacts (Standard Paths)
規劃產出物(標準流程)
PRD              → docs/prd.md
Architecture     → docs/architecture.md
Sharded Epics    → docs/epics/
Sharded Stories  → docs/stories/
QA Assessments   → docs/qa/assessments/
QA Gates         → docs/qa/gates/
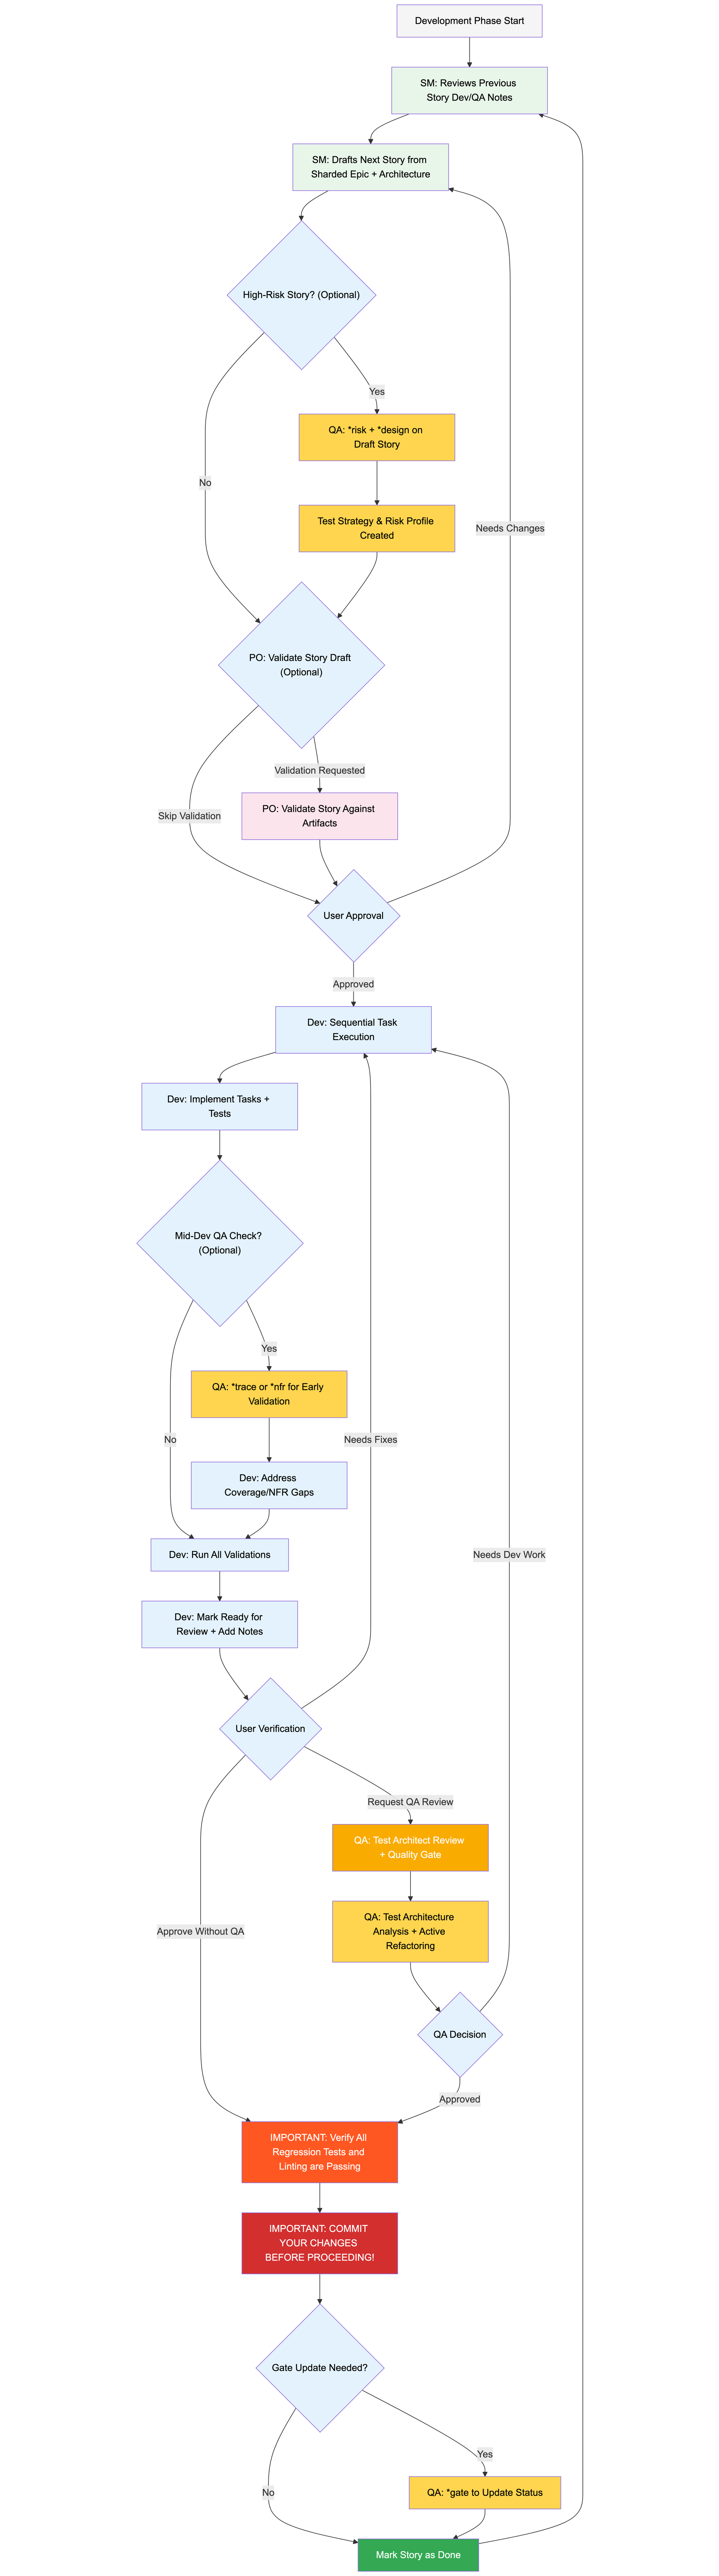
The Core Development Cycle (IDE)
核心開發週期(IDE)
Once planning is complete and documents are sharded, BMad follows a structured development workflow:
一旦規劃完成並且文件被切分,BMad 會遵循一個有結構的開發工作流程:
Prerequisites 先決條件
在安裝 BMad Method 之前,請先確認您已具備:
- Node.js ≥ 18, npm ≥ 9
- Git installed and configured
已安裝並設定好的 Git - (Optional) VS Code with "Markdown All in One" + "Markdown Preview Mermaid Support" extensions
(選用)已安裝 VS Code 並加裝「Markdown All in One」與「Markdown Preview Mermaid Support」擴充功能
Installation 安裝
Optional 選用
如果您想在網頁上使用 Claude(Sonnet 4 或 Opus)、Gemini Gem(2.5 Pro)或自訂 GPT 進行規劃:
- Navigate to
dist/teams/前往dist/teams/ - Copy
team-fullstack.txt複製team-fullstack.txt - Create new Gemini Gem or CustomGPT
建立新的 Gemini Gem 或 CustomGPT - Upload file with instructions: "Your critical operating instructions are attached, do not break character as directed"
上傳帶有指示的檔案:「已附上你的主要操作指示,請依指示保持角色設定且勿偏離」 - Type
/helpto see available commands
輸入/help以查看可用指令
IDE Project Setup IDE 專案設定
# Interactive installation (recommended)
npx bmad-method install
OpenCode
BMAD integrates with OpenCode via a project-level opencode.jsonc/opencode.json (JSON-only, no Markdown fallback).
BMAD 透過專案層級的 opencode.jsonc / opencode.json 與 OpenCode 整合(僅支援 JSON,不提供 Markdown 備援)。
- Installation: 安裝:
- Run
npx bmad-method installand chooseOpenCodein the IDE list.
執行npx bmad-method install,並在 IDE 清單中選擇OpenCode。
- Run
- The installer will detect an existing
opencode.jsonc/opencode.jsonor create a minimalopencode.jsoncif missing.
安裝程式會偵測是否已存在opencode.jsonc/opencode.json,若不存在則會建立一個最簡化的opencode.jsonc。 - It will: 它會:
- Ensure
instructionsincludes.bmad-core/core-config.yaml(and each selected expansion pack’sconfig.yaml).
確保instructions包含.bmad-core/core-config.yaml(以及每個已選擇擴充包的config.yaml)。
- Ensure
- Merge BMAD agents and commands using file references (
{file:./.bmad-core/...}), idempotently.
使用檔案參考({file:./.bmad-core/...})合併 BMAD 代理和指令,且操作應具備冪等性。 - Preserve other top-level fields and user-defined entries.
保留其他頂層欄位與使用者自訂的條目。 - Prefixes and collisions:
前綴與碰撞:- You can opt-in to prefix agent keys with
bmad-and command keys withbmad:tasks:to avoid name collisions.
您可以選擇為代理程式金鑰加上前綴bmad-,以及為指令金鑰加上前綴bmad:tasks:,以避免名稱衝突。
- You can opt-in to prefix agent keys with
- If a key already exists and is not BMAD-managed, the installer will skip it and suggest enabling prefixes.
如果某個金鑰已存在且不是由 BMAD 管理,安裝程式會跳過該金鑰並建議啟用前綴。 - What gets added: 將會新增的項目:
instructions:.bmad-core/core-config.yamlplus any selected expansion packconfig.yamlfiles.instructions:.bmad-core/core-config.yaml以及任何所選擴充套件config.yaml檔案。
agent: BMAD agents from core and selected packs.agent:來自核心與已選套件的 BMAD 代理。prompt:{file:./.bmad-core/agents/<id>.md}(or pack path)prompt:{file:./.bmad-core/agents/<id>.md}(或套件路徑)
mode:primaryfor orchestrators, otherwiseall:用於協調器,否則為
modealltools:{ write: true, edit: true, bash: true }description: extracted from the agent’swhenToUse:從代理的
descriptionwhenToUse擷取command: BMAD tasks from core and selected packs.command:來自核心和已選套件的 BMAD 任務。template:{file:./.bmad-core/tasks/<id>.md}(or pack path)template:{file:./.bmad-core/tasks/<id>.md}(或套件路徑)
description: extracted from the task’s “Purpose” sectiondescription:從任務的「目的」欄位擷取- Selected Packages Only: 僅選取的套件:
- The installer includes agents and tasks only from the packages you selected in the earlier step (core and chosen packs).
安裝程式僅包含你在先前步驟中選取的套件(核心與所選套件)中的代理與任務。
- The installer includes agents and tasks only from the packages you selected in the earlier step (core and chosen packs).
- Refresh after changes: 變更後請重新整理:
- The installer safely updates entries without duplication and preserves your custom fields and comments.
安裝程式會安全地更新條目而不重複,並保留您自訂的欄位和註解。
- The installer safely updates entries without duplication and preserves your custom fields and comments.
- Optional convenience script:
可選的便利腳本:
You can add a script to your project’s package.json for quick refreshes:
您可以將一個腳本加入專案的 package.json 中,以便快速重新整理:
{
  "scripts": {
    "bmad:opencode": "bmad-method install -f -i opencode"
  }
}
Re-run: 重新執行:
npx bmad-method install -f -i opencodeCodex (CLI & Web) Codex(CLI 與網頁)
BMAD 透過 AGENTS.md 與已提交的核心代理檔案整合 OpenAI Codex。
- Two installation modes: 兩種安裝模式:
- Codex (local only): keeps
.bmad-core/ignored for local dev.
Codex(僅限本機):將.bmad-core/保留為本機開發時忽略。npx bmad-method install -f -i codex -d .
- Codex (local only): keeps
- Codex Web Enabled: ensures
.bmad-core/is tracked so you can commit it for Codex Web.
啟用 Codex 網頁:確保.bmad-core/被追蹤,讓你可以為 Codex 網頁提交它。npx bmad-method install -f -i codex-web -d .
- What gets generated: 會產生的內容:
AGENTS.mdat the project root with a BMAD section containing
在專案根目錄生成AGENTS.md,其中包含一個 BMAD 區段,內容為- How-to-use with Codex (CLI & Web)
與 Codex 的使用方式(CLI 與 Web)
- How-to-use with Codex (CLI & Web)
- Agent Directory (Title, ID, When To Use)
代理人目錄(標題、ID、適用情況) - Detailed per‑agent sections with source path, when-to-use, activation phrasing, and YAML
每個代理人的詳細章節,包含來源路徑、適用時機、啟動用語,以及 YAML - Tasks with quick usage notes
具有快速使用說明的任務
- If a
package.jsonexists, helpful scripts are added:
如果存在package.json,將新增有用的腳本:bmad:refresh,bmad:list,bmad:validate
- Using Codex: 使用 Codex:
- CLI: run
codexin the project root and prompt naturally, e.g., “As dev, implement …”.
CLI:在專案根目錄執行codex並以自然語氣提示,例如:「作為開發者,實作……」。
- CLI: run
- Web: commit
.bmad-core/andAGENTS.md, then open the repo in Codex and prompt the same way.
Web:提交.bmad-core/和AGENTS.md,然後在 Codex 中打開該倉庫並以相同方式提示。 - Refresh after changes: 變更後請重新整理:
Special Agents 特殊代理人
There are two BMad agents — in the future they'll be consolidated into a single BMad-Master.
有兩個 BMad 代理 — 未來它們將合併成單一的 BMad-Master。
BMad-Master
此代理人可以執行所有其他代理人能做的任何任務或指令,但不包含實際故事實作。此外,當在網路上時,此代理人能透過存取知識庫來協助說明 BMad 方法,並向你解釋關於此流程的任何內容。
如果你不想在不同代理(除了 dev)之間來回切換,這就是適合你的代理。請記得,隨著上下文變大,代理的效能會下降,因此重要的是要指示代理將對話壓縮,並以壓縮後的對話作為初始訊息開始新的對話。經常這樣做,最好在每個故事實作完成後進行。
BMad-Orchestrator
此代理不應在整合開發環境(IDE)中使用,因為它是一個重量級、特殊用途的代理,會使用大量上下文並能變形為其他任何代理。此代理僅用於協助網頁套件中的團隊。若您使用網頁套件,將會遇到 BMad Orchestrator。
How Agents Work 代理如何運作
Dependencies System
每個代理都有一個 YAML 區段,用於定義其相依性:
dependencies:
  templates:
    - prd-template.md
    - user-story-template.md
  tasks:
    - create-doc.md
    - shard-doc.md
  data:
    - bmad-kb.md
Key Points: 重點:
- Agents only load resources they need (lean context)
代理只載入所需資源(精簡上下文) - Dependencies are automatically resolved during bundling
相依性會在打包時自動解析 - Resources are shared across agents to maintain consistency
資源在代理之間共享以維持一致性
Agent Interaction 代理互動
In IDE: 在 IDE 中:
# Some IDEs, like Cursor or Windsurf for example, utilize manual rules so interaction is done with the '@' symbol
@pm Create a PRD for a task management app
@architect Design the system architecture
@dev Implement the user authentication

# Some IDEs, like Claude Code, use slash commands instead
/pm Create user stories
/dev Fix the login bug
Interactive Modes 互動模式
- Incremental Mode: Step-by-step with user input
增量模式:逐步進行並接受使用者輸入 - YOLO Mode: Rapid generation with minimal interaction
YOLO 模式:以最低互動快速生成
IDE Integration 整合 IDE
IDE Best Practices IDE 最佳實務
- Context Management: Keep relevant files only in context, keep files as lean and focused as necessary
上下文管理:僅在上下文中保留相關檔案,並將檔案保持精簡且專注於必要內容 - Agent Selection: Use appropriate agent for task
代理選擇:為任務使用適當的代理 - Iterative Development: Work in small, focused tasks
反覆開發:以小而專注的任務進行工作 - File Organization: Maintain clean project structure
檔案組織:維持乾淨的專案結構 - Commit Regularly: Save your work frequently
經常提交:經常儲存你的工作
The Test Architect (QA Agent)
測試架構師(QA 代理)
Overview 概覽
BMad 中的 QA 代理不只是「資深開發審查者」——它是一位在測試策略、品質門檻與風險導向測試方面擁有深厚專業的測試架構師。這位名為 Quinn 的代理在品質事務上提供諮詢權威,同時在安全可行時主動改進程式碼。
Quick Start (Essential Commands)
快速開始(必要指令)
@qa *risk {story}       # Assess risks before development
@qa *design {story}     # Create test strategy
@qa *trace {story}      # Verify test coverage during dev
@qa *nfr {story}        # Check quality attributes
@qa *review {story}     # Full assessment → writes gate
Command Aliases (Test Architect)
指令別名(測試架構師)
文件說明中為方便使用了簡寫。兩種寫法皆為有效。
*risk    → *risk-profile
*design  → *test-design
*nfr     → *nfr-assess
*trace   → *trace-requirements (or just *trace)
*review  → *review
*gate    → *gate
Core Capabilities 核心能力
1. Risk Profiling (*risk)
1. 風險剖析( *risk )
When: After story draft, before development begins (earliest intervention point)
何時:在需求草稿完成後、開發開始前(最早的介入時點)
Identifies and assesses implementation risks:
識別並評估實施風險:
- Categories: Technical, Security, Performance, Data, Business, Operational
類別:技術、資安、效能、資料、商業、營運 - Scoring: Probability × Impact analysis (1-9 scale)
評分:機率 × 影響分析(1-9 等級) - Mitigation: Specific strategies for each identified risk
緩解:針對每項識別風險的具體策略 - Gate Impact: Risks ≥9 trigger FAIL, ≥6 trigger CONCERNS (see
tasks/risk-profile.mdfor authoritative rules)
閘門影響:風險分數 ≥9 觸發 失敗,≥6 觸發 關切(有關權威規則請參見tasks/risk-profile.md)
2. Test Design (*design)
2. 測試設計( *design )
When: After story draft, before development begins (guides what tests to write)
時間點:在故事草案完成後、開發開始前(指導要撰寫哪些測試)
Creates comprehensive test strategies including:
建立完整的測試策略,包括:
- Test scenarios for each acceptance criterion
每個驗收準則的測試情境 - Appropriate test level recommendations (unit vs integration vs E2E)
適當的測試層級建議(單元測試 vs 整合測試 vs 端對端測試) - Risk-based prioritization (P0/P1/P2)
基於風險的優先順序(P0/P1/P2) - Test data requirements and mock strategies
測試資料需求與模擬策略 - Execution strategies for CI/CD integration
CI/CD 整合的執行策略
Example output: 範例輸出:
test_summary:
  total: 24
  by_level:
    unit: 15
    integration: 7
    e2e: 2
  by_priority:
    P0: 8 # Must have - linked to critical risks
    P1: 10 # Should have - medium risks
    P2: 6 # Nice to have - low risks
3. Requirements Tracing (*trace)
3. 需求追蹤( *trace )
When: During development (mid-implementation checkpoint)
何時:在開發期間(實作中期檢查點)
Maps requirements to test coverage:
將需求對應至測試覆蓋範圍:
- Documents which tests validate each acceptance criterion
記錄哪些測試驗證每個驗收準則 - Uses Given-When-Then for clarity (documentation only, not BDD code)
為清晰起見使用 Given-When-Then(僅限文件說明,非 BDD 程式碼) - Identifies coverage gaps with severity ratings
識別具有嚴重性評級的覆蓋缺口 - Creates traceability matrix for audit purposes
建立用於稽核目的的可追溯矩陣
4. NFR Assessment (*nfr)
4. 非功能需求評估 ( *nfr )
When: During development or early review (validate quality attributes)
何時:在開發期間或早期審查時(驗證品質屬性)
Validates non-functional requirements:
驗證非功能性需求:
- Core Four: Security, Performance, Reliability, Maintainability
核心四要素:安全性、效能、可靠性、可維護性 - Evidence-Based: Looks for actual implementation proof
以證據為本:尋找實際實作的證明 - Gate Integration: NFR failures directly impact quality gates
閘門整合:非功能性需求(NFR)失敗會直接影響品質閘門
5. Comprehensive Test Architecture Review (*review)
5. 全面測試架構審查( *review )
When: After development complete, story marked "Ready for Review"
何時:在開發完成後,且故事標記為「準備審查」
When you run @qa *review {story}, Quinn performs:
當你執行 @qa *review {story} 時,Quinn 會執行:
- Requirements Traceability: Maps every acceptance criterion to its validating tests
需求可追溯性:將每項驗收準則對應到其驗證測試 - Test Level Analysis: Ensures appropriate testing at unit, integration, and E2E levels
測試層級分析:確保在單元、整合與端對端(E2E)層級進行適當的測試 - Coverage Assessment: Identifies gaps and redundant test coverage
覆蓋率評估:識別測試覆蓋的缺口與重複部分 - Active Refactoring: Improves code quality directly when safe
主動重構:在安全的情況下直接改善程式碼品質 - Quality Gate Decision: Issues PASS/CONCERNS/FAIL status based on findings
品質門檻決策:根據發現的情況發佈 PASS/CONCERNS/FAIL 狀態
6. Quality Gates (*gate)
6. 品質門檻( *gate )
When: After review fixes or when gate status needs updating
何時:在檢閱修正之後或需要更新門控狀態時
Manages quality gate decisions:
管理品質門控決策:
- Deterministic Rules: Clear criteria for PASS/CONCERNS/FAIL
確定性規則:明確的通過/關注/失敗標準 - Parallel Authority: QA owns gate files in
docs/qa/gates/
平行權限:QA 擁有docs/qa/gates/中的門控檔案 - Advisory Nature: Provides recommendations, not blocks
建議性:提供建議,而非阻擋 - Waiver Support: Documents accepted risks when needed
豁免支援:在必要時文件化被接受的風險
Note: Gates are advisory; teams choose their quality bar. WAIVED requires reason, approver, and expiry date. See templates/qa-gate-tmpl.yaml for schema and tasks/review-story.md (gate rules) and tasks/risk-profile.md for scoring.
注意:閘門為建議性;團隊自行決定其品質標準。豁免(WAIVED)需提供理由、核准者與到期日。參見 templates/qa-gate-tmpl.yaml 以了解結構,及 tasks/review-story.md (閘門規則)與 tasks/risk-profile.md 以了解評分。
Working with the Test Architect
與測試架構師合作
Integration with BMad Workflow
與 BMad 工作流程整合
The Test Architect provides value throughout the entire development lifecycle. Here's when and how to leverage each capability:
測試架構師在整個開發生命週期中都提供價值。以下說明何時以及如何利用每項功能:
Stage 階段 | Command 指令 | When to Use 何時使用 | Value 值 | Output 輸出 |
|---|---|---|---|---|
Story Drafting 故事草稿 |
| After SM drafts story | Identify pitfalls early 及早識別陷阱 |
|
| After risk assessment 風險評估後 | Guide dev on test strategy |
| |
Development 開發 |
| Mid-implementation 實作中期 | Verify test coverage 驗證測試覆蓋率 |
|
| While building features 在構建功能時 | Catch quality issues early |
| |
Review 審查 |
| Story marked complete 故事標記為已完成 | Full quality assessment 完整品質評估 | QA Results in story + gate file |
Post-Review 審查後 |
| After fixing issues 修正問題後 | Update quality decision 更新品質決策 | Updated |
Example Commands 範例指令
# Planning Stage - Run these BEFORE development starts
@qa *risk {draft-story}     # What could go wrong?
@qa *design {draft-story}   # What tests should we write?

# Development Stage - Run these DURING coding
@qa *trace {story}          # Are we testing everything?
@qa *nfr {story}            # Are we meeting quality standards?

# Review Stage - Run when development complete
@qa *review {story}         # Comprehensive assessment + refactoring

# Post-Review - Run after addressing issues
@qa *gate {story}           # Update gate status
Quality Standards Enforced
實施的品質標準
Quinn enforces these test quality principles:
Quinn 執行以下測試品質原則:
- No Flaky Tests: Ensures reliability through proper async handling
無不穩定測試:透過正確的非同步處理確保可靠性 - No Hard Waits: Dynamic waiting strategies only
不使用硬性等待:僅採用動態等待策略 - Stateless & Parallel-Safe: Tests run independently
無狀態且可並行:測試彼此獨立執行 - Self-Cleaning: Tests manage their own test data
自我清理:測試自行管理其測試資料 - Appropriate Test Levels: Unit for logic, integration for interactions, E2E for journeys
適當的測試層級:邏輯用單元測試、互動用整合測試、流程用端對端測試 - Explicit Assertions: Keep assertions in tests, not helpers
明確的斷言:把斷言放在測試中,而不是放在輔助函式裡
Gate Status Meanings 入口狀態含義
- PASS: All critical requirements met, no blocking issues
通過:所有關鍵需求已達成,無阻礙性問題 - CONCERNS: Non-critical issues found, team should review
關注事項:發現非關鍵性問題,團隊應檢視 - FAIL: Critical issues that should be addressed (security risks, missing P0 tests)
失敗:應立即處理的關鍵問題(安全風險、缺少 P0 測試) - WAIVED: Issues acknowledged but explicitly accepted by team
豁免:團隊已知曉但明確接受的問題
Special Situations 特殊情況
High-Risk Stories: 高風險故事
- Always run
*riskand*designbefore development starts
開發開始前務必先執行*risk與*design - Consider mid-development
*traceand*nfrcheckpoints
開發中請考慮設置*trace與*nfr的檢查點
Complex Integrations: 複雜整合:
- Run
*traceduring development to ensure all integration points tested
於開發期間執行*trace,以確保所有整合點皆已測試 - Follow up with
*nfrto validate performance across integrations
與*nfr跟進,以驗證跨整合的效能
Performance-Critical: 效能關鍵:
- Run
*nfrearly and often during development
在開發早期並經常執行*nfr - Don't wait until review to discover performance issues
不要等到審查時才發現效能問題
Brownfield/Legacy Code: 棕地/舊有程式碼:
- Start with
*riskto identify regression dangers
以*risk開始以識別回歸風險 - Use
*reviewwith extra focus on backward compatibility
對*review加強對向後相容性的關注
Best Practices 最佳實務
- Early Engagement: Run
*designand*riskduring story drafting
早期參與:在撰寫故事草稿時執行*design和*risk - Risk-Based Focus: Let risk scores drive test prioritization
風險導向重點:讓風險分數主導測試優先順序 - Iterative Improvement: Use QA feedback to improve future stories
循環改進:利用 QA 回饋來改善未來的故事 - Gate Transparency: Share gate decisions with the team
門檻透明:與團隊分享門檻決策 - Continuous Learning: QA documents patterns for team knowledge sharing
持續學習:建立 QA 文件與範例以利團隊知識共享 - Brownfield Care: Pay extra attention to regression risks in existing systems
既有系統關懷:對現有系統的回歸風險特別留意
Output Paths Reference 輸出路徑參考
Test Architect 輸出檔案儲存位置快速參考:
*risk-profile  → docs/qa/assessments/{epic}.{story}-risk-{YYYYMMDD}.md
*test-design   → docs/qa/assessments/{epic}.{story}-test-design-{YYYYMMDD}.md
*trace         → docs/qa/assessments/{epic}.{story}-trace-{YYYYMMDD}.md
*nfr-assess    → docs/qa/assessments/{epic}.{story}-nfr-{YYYYMMDD}.md
*review        → QA Results section in story + gate file reference
*gate          → docs/qa/gates/{epic}.{story}-{slug}.yml
Technical Preferences System
技術偏好系統
BMad includes a personalization system through the technical-preferences.md file located in .bmad-core/data/ - this can help bias the PM and Architect to recommend your preferences for design patterns, technology selection, or anything else you would like to put in here.
BMad 包含一個個人化系統,透過位於 .bmad-core/data/ 的 technical-preferences.md 檔案 —— 這可以幫助偏向 PM 與 Architect 推薦你在設計樣式、技術選擇或任何你希望放在此處的偏好。
Using with Web Bundles 與 Web Bundles 一起使用
When creating custom web bundles or uploading to AI platforms, include your technical-preferences.md content to ensure agents have your preferences from the start of any conversation.
在建立自訂 web bundles 或上傳到 AI 平台時,請包含你的 technical-preferences.md 內容,以確保代理從對話開始就擁有你的偏好。
Core Configuration 核心配置
.bmad-core/core-config.yaml 檔案是個關鍵的設定檔,讓 BMad 能與不同的專案結構無縫運作,未來會提供更多選項。目前最重要的是 yaml 中的 devLoadAlwaysFiles 清單區段。
Developer Context Files 開發人員上下文檔案
定義開發代理應該始終載入的檔案:
devLoadAlwaysFiles:
  - docs/architecture/coding-standards.md
  - docs/architecture/tech-stack.md
  - docs/architecture/project-structure.md
你應該從分片(sharding)你的架構中確認這些文件是否存在,確認它們盡可能精簡,並且僅包含你希望開發代理永遠載入其上下文的資訊。這些是代理會遵循的規則。
隨著專案成長且程式碼開始出現一致的模式,程式編寫標準應縮減為僅包含代理仍需執行的標準。代理會查看檔案中周圍的程式碼,以推斷與當前任務相關的程式編寫標準。
Getting Help 獲得協助
- Discord Community: Join Discord
Discord 社群:Join Discord - GitHub Issues: Report bugs
GitHub Issues:回報錯誤 - Documentation: Browse docs
文件說明:瀏覽文件 - YouTube: BMadCode Channel
YouTube:BMadCode 頻道
Conclusion 結論
請記住:BMad 的設計目的是強化你的開發流程,而非取代你的專業判斷。將它作為一個強大的工具來加速你的專案,同時保有對設計決策與實作細節的掌控。